Thresh, Winnow, Dry and Storing Seed
Here are some definitions of the process of systematically separating the unwanted parts of the dry plant from the part you want–the seeds:
Curing: Allowing a seed to mature on the plant usually 2-3 weeks beyond when the plant is at its peak fruiting.
Picking: Pretty obvious, picking is collecting the dried seed, flower heads or whole plants directly from the field.
Threshing : Means beating the dry plant stalks to separate the seeds from the seed head and stalks of the plants. After threshing, you are left with seed and chaff, and you discard stems.
Chaff: “Chaff” is the dried unwanted parts that you get when you thresh— the petals, sepals, small leaves and bits of stem that come off the plant during threshing.
Winnowing: The final process of separating the seed from the chaff.
Storing: The proper conditions to keep cleaned seed so they stay alive and nutritionally sound.
Orthodox Seeds: Seeds that can be dried and frozen and will still germinate. The majority of seed are orthodox seeds. This entire section discusses handling orthodox seeds.
Recalcitrant Seeds: Seeds that are fussy and cannot survive being dried or frozen. Also known as unorthodox seeds. The section on storing acorns and chestnuts addresses recalcitrant seeds.
I am so grateful to Bill McDorman and Belle Starr for teaching the proper methods for harvesting and storing seed through their fantastic class, Seed School Online from the Rocky Mountain Seed Alliance, which helps gardeners and seed savers delve deeply into the art and history of agricultural seed saving and varietal preservation. Check them out!
Harvesting Seed
When are seeds ready to collect? It depends on the plant, but not all seeds on a given plant ripen at the same time. Some seeds, though not all, continue to mature after you collect them—especially Aster family plants. It takes some practice in the field to determine when a seed is mature, but not overly mature. At some point in the maturation process, the seed head will release its seeds from the plant, sending the seed babies off to start new lives. You want to collect seed when the seed is approaching maturity, but has not yet left the parent plant (overly mature).
As they ripen, seeds:
- generally darken as they mature
- generally mature 4-6 weeks after peak bloom of the flower
- are fully dry when the whole flower head is fully crispy-dry including ¼” of the supporting stem below the flower. The outer husks of the seeds should shatter when you roll the dried flower between your fingers, releasing the seeds
- detach easily from the stalk or pod
Picking and Curing the Seeds
Seeds come to maturity at a later time than the fruits that encase them. For example, when a ground cherry is at its peak for eating as a fruit, the seed is not yet 100% mature. By the time the seeds are mature and at peak for harvesting as seed, the fleshy parts of the fruit may have started to shrivel and dry.
Even seeds with no fleshy fruit need to cure until the seedpods are dry and brittle, and the seed is mature. You can sometimes harvest seed off a plant directly in the field, but if the seeds are small or have parachutes (pappus) it may be better to harvest the whole plant and cure it back at home where the seeds will not blow away or fall off the plant and get lost.
After being brought in from the field, the plant material should be air-dried until completely brittle, usually a few weeks. But, do not heat the seeds to dry them: that will kill them. Even drying in direct sun if temperatures are over 80 F can be too hot. I like to lay out plant material on an old bed sheet or screen in a warm, well-ventilated, dry room for a few weeks. Or, I keep drying plants upside down in open paper grocery bags in a dry room. Most seed harvesting is done in late summer and early fall and at that time the temperatures are warm, but humidity is starting to lower. It’s important to make sure you don’t pack the plant materials in too tightly together, or air won’t circulate around the plants and the seeds will not dry evenly, or the plants will mold. Moisture is a killer. Moldy seeds are no good. During this curing period, some immature seeds will continue to ripen and cure on the cut stalks. Some seed pods and seeds will fall open or fall off during this period. The sheet or bag will catch these.
Threshing
Now your cut plants are crispy dry. It’s time to start to remove the seed from the plants.
When choosing a threshing method, keep in mind you want to exert just enough force to liberate the seed, but no more force than you need to or you risk damaging the seed. We want to keep these seeds alive—for nutritional optimization—so we don’t want to break, scratch or beat up the seeds any more than necessary.
Here are a couple of methods to begin separating seed from the stalk and seed heads. Nine times out of ten I use the first method.
- Hand method: Clip away and discard as much of the stem and leaves as you can down to just the flower head. Then vigorously rub seed heads in your hands over a sheet or bucket catcher. Or tap the upside-down stalks against the side of a 5 gallon bucket.
- Pillowcase/Shoe method: Place roughly cut, dry, plant material into a pillowcase. Tie it closed, lay on the ground and beat the bag with a shoe or rubber hose. Or walk on the bag with a gentle twisting motion to break open the flower heads.
- Electric method: YouTube has videos of creative people who have home-built, small-quantity threshing machines, usually designed for agricultural grains. I’m not sure how these might work for the seed heads of wild plants which are more delicate. It could be tried, but my fear is it will beat up the seeds more than necessary. One model is made out of a five gallon bucket, a drill and some hardware. And I have seen pictures of other similar ideas utilizing weed-eaters and trashcans.
- And just FYI: Other equipment. Professional seed collectors that deal with large quantities of seed use machines such as color separators, debearders, dehullers, and gravity separators to clean seed to prepare to sell. All this is much more than you would ever need for our work.
Cleaning and Winnowing:
The threshing is done, and now you have seeds mixed in with chaff–bits of dry leaves and plant parts that are more similar in size to the seed. You have thrown out all the big stalks, leaves and non-seed part that you easily can.
Cleaning seeds from chaff reduces the chances that fungal spores or insect eggs will be mixed in with your stored seed and cause quality problems down the line. However, too rough of a cleaning method can scratch or break the seeds, which damage the seeds and their long-term quality. So take the middle road—clean what you can out, but don’t be compulsive. A couple of methods to further clean and separate seed from unwanted bits of petals, sepals, seed casings:
Cleaning Screens and Sieves
Colanders and Bowls: You need buy nothing in order to clean seeds. You certainly can get started by using a variety of home colanders with different sizes of holes to filter off the larger chaff from the seed. Even just swirling and bouncing the plant material around in a bowl will allow the lighter chaff to float up to the top to be picked off while the seed sinks to the bottom. I usually find this combination of bowl swirling and colander-sieving to be the way I start to clean most seeds. If I want to clean it further, I go onto Air Current Winnowing mode, described below. I think shopping thrift stores for atypical but suitable sieving equipment makes for fun shopping. Thrifty seed savers also shop fabric shop for different size netting that can be made into screens.
Garden Soil Sieves: The next step up, if you want to invest in some minimal equipment is to use a garden sieve—designed to use to clean soil, but can be used for seeds. Bonsai enthusiasts apparently use these sieves. I bought a garden sieve with 3 different size screens for about $15 online and it has helped me a lot. My understanding is that the numbered hole sizes roughly approximate the number of holes per 1 inch of mesh. So a #10 mesh has ten holes per inch, or allows about a 2 mm seed to fall through. (If you research sieve mesh sizes, it may be confusing as there are two different scales used to classify mesh opening sizes; US Sieve Series and Tyler Mesh Size. Tyler is more often used for industry and for very small particulates, like powders.)
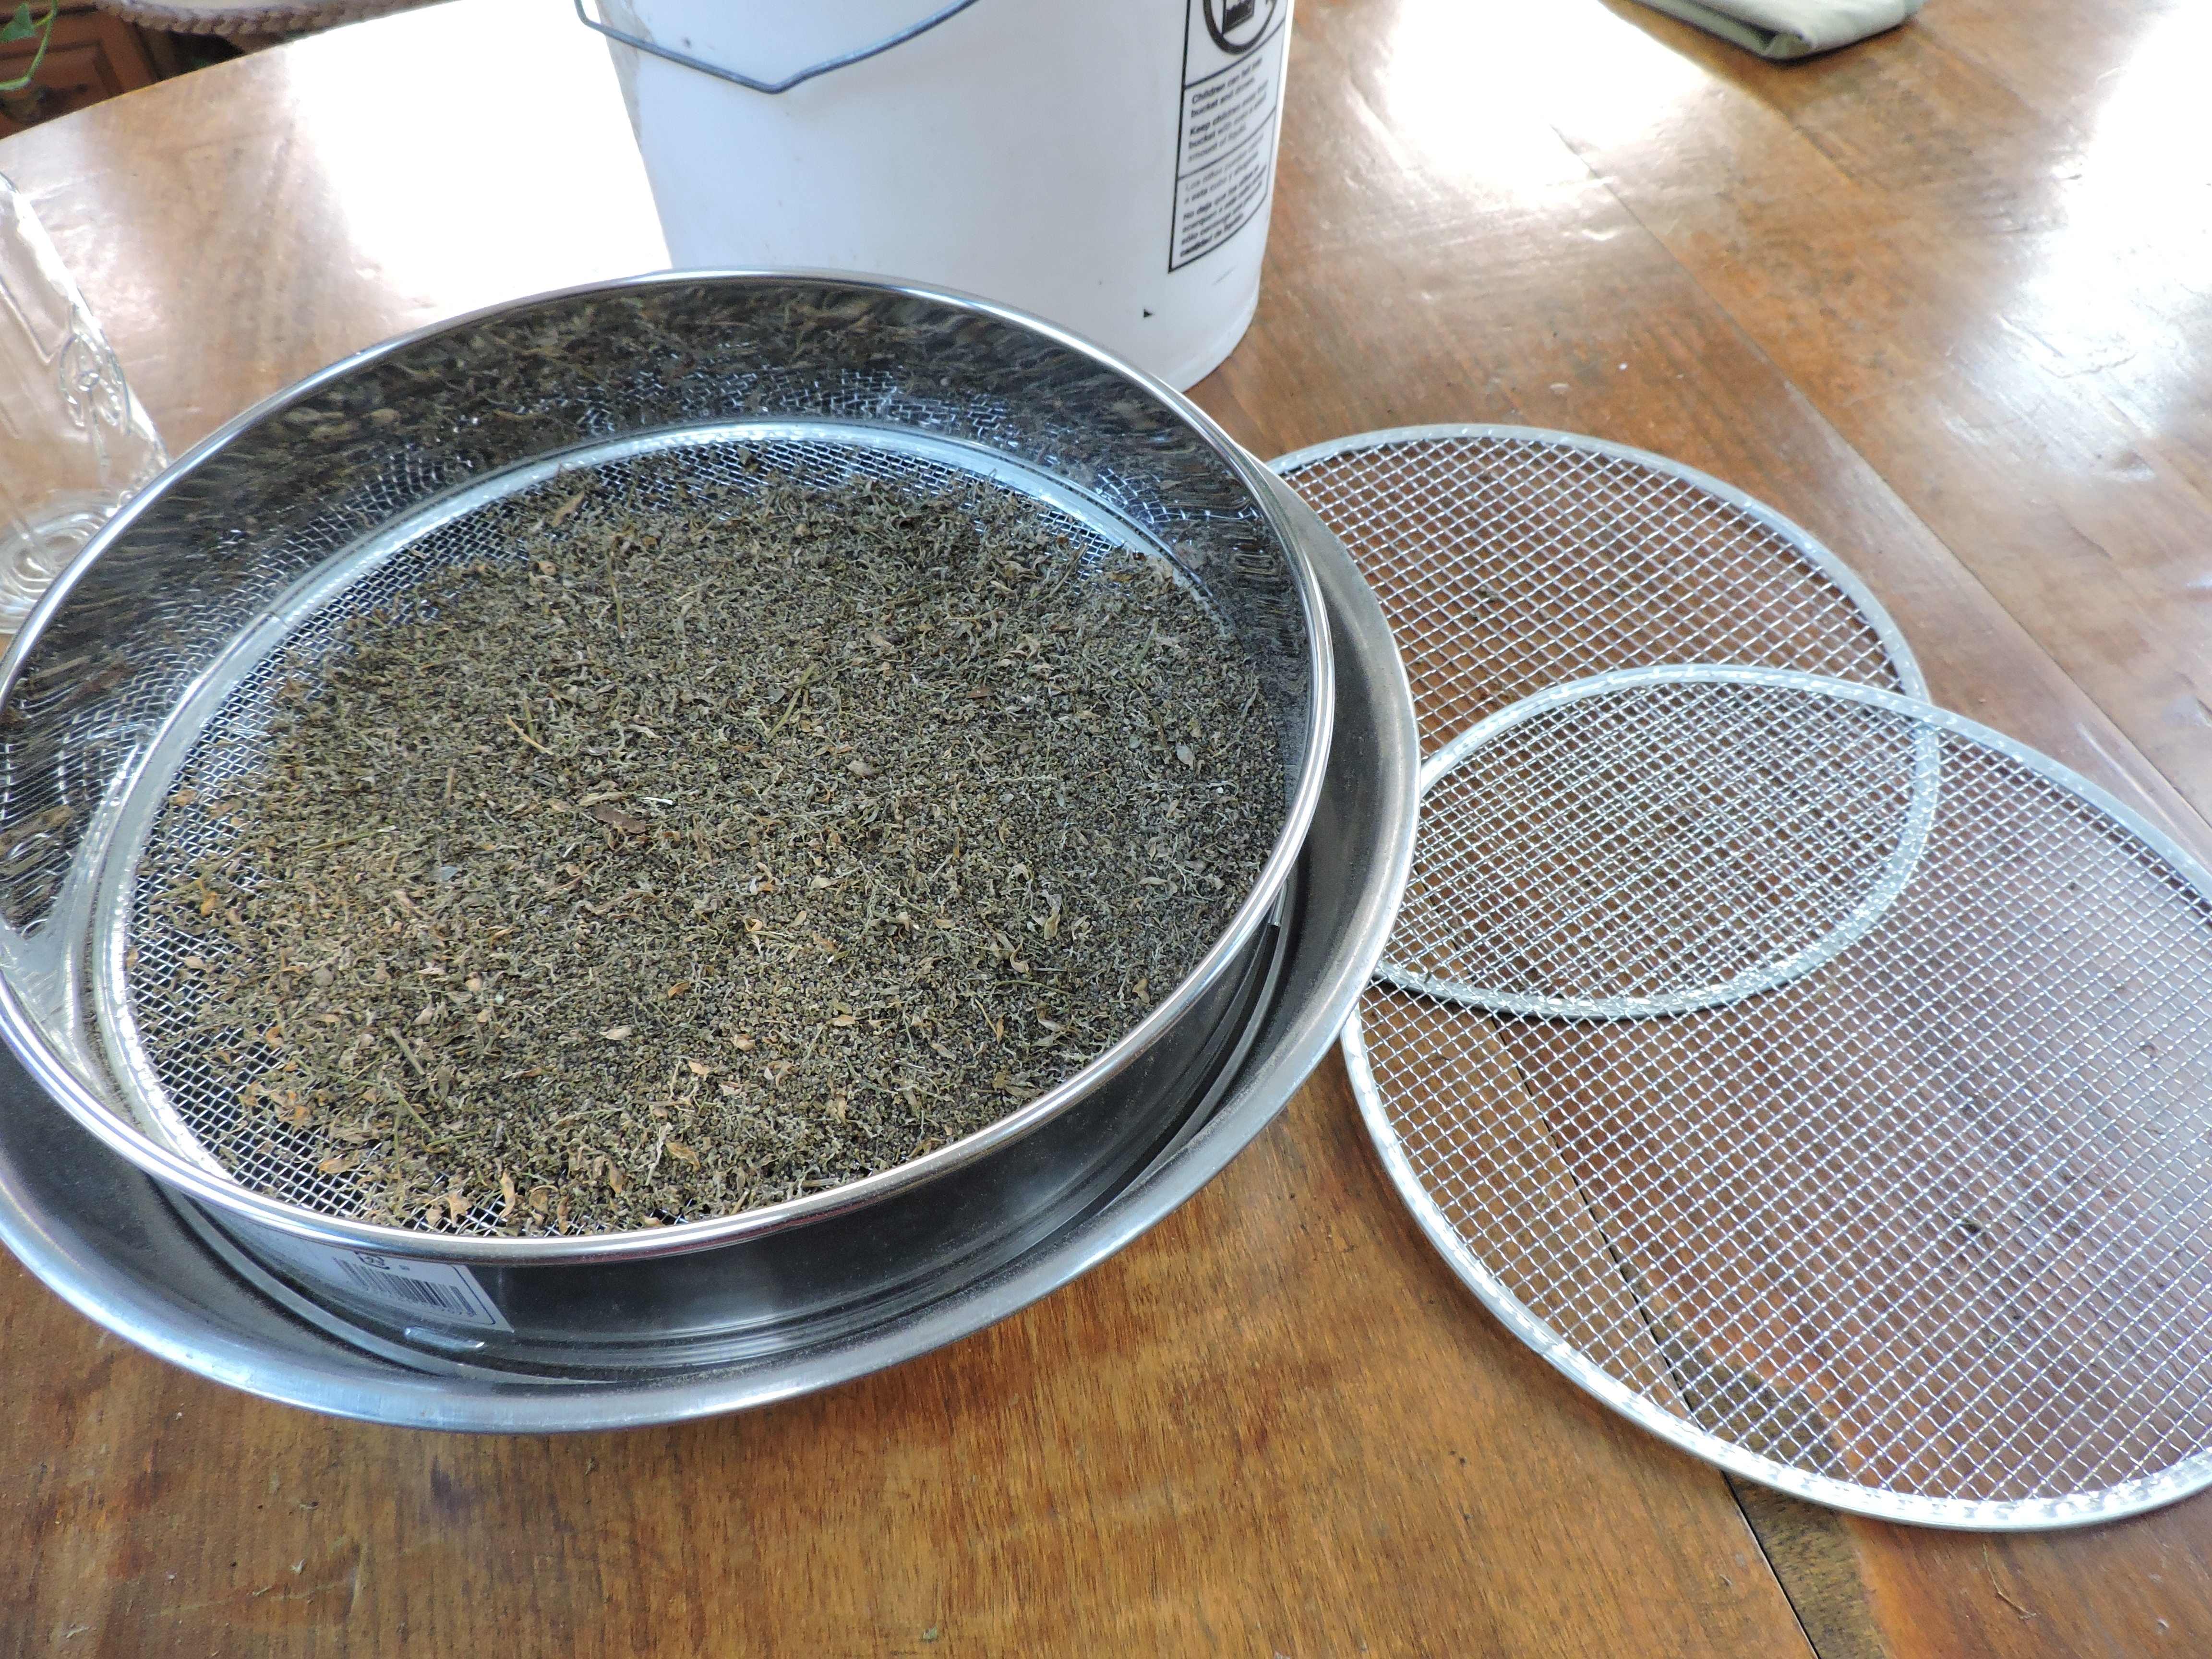
Seed Screen Boxes: You may never need this, but they are an alternative to the soil sieve above. These boxes are expensive if you buy them, much cheaper if you make them. You can build seed screen boxes using various sized hardware cloth and window screens. Seed screen boxes are usually 12” square wooden frames that stack or nest on top of each other. The top screen has holes that are just bigger than the seed—called the “scalping screen”. The box you place on the bottom should have screen holes just smaller than the seed—called the “sifting screen”. With this setup, the seeds fall through the top scalping screen (the larger chaff pieces are retained in the top box) and then the seeds are stopped at the lower screen, but the smaller bits and dust continue to fall on through the bottom sifting screen onto the ground. What is caught on the bottom sifting screen is the seed and chaff that is about the same size as the seed.
Check out this 3 minute video from Seedkeepers—to see how this combination of scalping and sifting screens work.
3 Air Current Winnowing Methods
If you used the scalping/sifting screen method outlines above- then what you now have is seed and chaff of about the same size—but they are not the same weight. The chaff will be lighter in weight. By using moving air (which can be blowing breath, natural winds or breeze generated from an electric fan) you can carefully let the breeze blow away the lighter chaff so you can retain the seeds. I am not compulsive about getting seed spotlessly chaff-free. You may never be able to remove all the chaff without losing a lot of seed as well. But if you don’t clean the seed somewhat, a large percentage of the mass in the container is inedible chaff, which may be misleading to the rehabber when he or she tries to measure out the food.
Winnowing is an art.
The first time you winnow any new seed, you will have to get a feel for how the relative weights of seed and chaff respond in the breeze. You’ll have to adjust how high to flip the seed up to catch the breeze and see how the air will lift off the chaff. Expect to make miscalculations and have half your seed blow out of the bowl as you learn. That is what the sheet is for—to catch the seed so you can start over and not lose your hard-earned seed.
Each batch of seed winnows differently based on the relative weights of all the plant and seed parts. Some seed is so small and similar in weight to the chaff that it is nearly impossible to winnow without most of the seed blowing away. In these cases, I don’t try to winnow, I let the animals glean through the material for the seed themselves.
1 Winnowing with an Electric Fan: This works best when the seed is a lot heavier than the chaff.
1) Work outside on a dry, not too windy day.
2) Lay out a bed sheet or tarp on the ground.
3) Set up an electric fan at one end of the sheet.
4) Place the plant material that needs cleaning into a large bowl.
5) Turn the fan on “low”. Stand a few feet in front of the fan perpendicular to the breeze coming in from your side.
Drop method: Hold your bowl with one hand and pick up a handful of plant material in the other hand. Hold the seed above the fan’s wind and let it fall in a steady stream through the wind and into the bowl, with the sheet to catch what misses the bowl.
Pour method: Using two large bowls, hold one bowl of seed material above the stream of air and hold one empty bowl below. Pour the seeds through the fan breeze and catch the seed in the lower bowl while the chaff blows away.
Flip method: Hold a large bowl of seed material both hands and stand in front of the fan breeze. Simultaneously shake the bowl away and up from you, flipping the material inside the bowl (like an omelet flip). Try to flip it so the lightweight material rises in the air above the lip of the bowl and blows away while the heavier seed falls back into the bowl.
Until you get the hang of any of these methods, seed may blow away with the chaff, onto the sheet. Then you get to try again.
2 Winnowing with the Natural Wind : Once you get the hang of winnowing with the fan, you can skip using the fan and just use the natural wind at your back on a breezy day. The fan method is easier because it is a more controlled, steady breeze. But you’ll soon get a feel for how to use the natural breezes to winnow you seed.
3 Winnowing with Your Breath: You can also use your breath to blow the chaff away. This method is nice because you have complete control over how hard you blow. Sometimes this is the best method for seed that is closer in weight to the chaff weight.
Storing Seeds
The mantra of seed storing: Cool, dark and dry.
Again, seeds are alive and we want to keep them that way as we store them to maintain maximum nutritional value for the critters. Seeds are embryos, and we want to slow down their metabolism by keeping them cool, dark and dry so they go into hibernation and do not run out of the internal food stores that keep them alive. How long seeds can survive is not well known empirically. According to Bill McDorman, archeologists found seeds of the Methusala Date Palm that were buried underground in clay pots for 2000 yrs. and researchers got those seeds to sprout! However, most seeds—even in very good storage conditions—probably will not survive more than 10-20 years. The only way to know if a seed is still alive is to try to sprout it.
All the info above to describe seed storage has been worked out by the Rocky Mountain Seed Alliance and I learned through a class by Bill McDorman and Belle Starr through their Seed School Online. They are a wealth of information about seeds. Okay, so let’s break down seed storage:
Storing Seeds Summary: COOL, DRY, DARK
- Light, heat and moisture are enemies of your seeds.
- “Cool” means try to never let seeds go above 80 F.
- Seed longevity increases as storage temperature decreases.
- Never store containers in direct sunlight which would create a greenhouse heating effect as well as a light problem.
- Keep seeds in the dark.
- A “dry” seed or pod shatters when bent or hammered.
- Jar up seeds on low humidity days,
- Best containers for storage are either metal or glass that keep humidity, bugs and rodents out. Glass canning jars with gasketed lids work well.
- Plastic containers are not considered to be the best moisture barriers and are not rodent proof. Plastic bags are too moisture permeable.
- Well-dried seeds can be kept well in a refrigerator in proper containers. Refrigerator environments are too humid for seeds in open containers, paper bags or plastic bags.
- Well-dried seeds can be kept well in a freezer, in proper containers. Because you don’t put seeds in the freezer until they are very dry, ice crystals do not form in the seed the way they do in fruit.
- Always let refrigerated seeds warm to room temperature before opening the container.
Deeper Details
Cool
You do certainly want to keep your seeds under 80 degrees fahrenheit for ANY length of time. That’s why we don’t heat-dry or sun-dry seeds. Research shows, above 80 F show a steep increase in seed death. If possible, refrigeration or freezing is best for medium to long-term storage.Here are some comparisons of seed longevity by storage conditions:
- Dry room temperature (but well under 80 F) in an air-permeable container= a few months storage conditions
- Refrigerator in an air-tight container = a year storage
- Freezer an air-tight container = multiple years of storage
Consistency of temperature helps, so don’t take your seeds out of the fridge every day to check on them. If you have to take the seeds out of the refrigerator or freezer for some reason, allow the container to come up to room temperature before you open the container. Otherwise, condensation will form on your formerly dry seeds and violate the dryness condition needed.
Dark
Aim for total darkness. The refrigerator or freezer will help maintain darkness. If you use glass jars, you can roll up some dark paper and insert a dark tube against the glass walls to make them opaque. If you are storing at room temperature, closed paper grocery sacks keep out light. Or if you have a bunch of lidded jars, toss a thick blanket over them. I think you can figure out “dark.”
Dry
If you have cured your seed for a few weeks after harvest and are ready to feed it to critters immediately, you need to do nothing further as far as drying goes. But if you plan to store your seed for more than a few months or in an air-tight container you should read on.
“Dry” is the most technically difficult out of the three conditions to figure out. You want your seed to be VERY DRY before you put it in an air-tight container that doesn’t breathe. (Moist seed in a closed container will mold, rot or die. Dry seed in an air-permeable container will reabsorb moisture from the surrounding humid air like a sponge. So your two variables to control are
1) how dry the seed is when you put it in a container and
2) how air-permeable the container is.
Paper or cloth bags are very air-permeable leaving seeds subject to the whims of the humidity of the surrounding air. This may be okay if the humidity and temperatures are low and it is only for a few months. Plastic ziploc bags, plastic food containers or buckets with lids are considered fairly air-tight, though not as much so as glass or metal containers that have lids with gaskets. If you plan to store your seeds in a refrigerator or freezer, plastic is not the best option because refrigerator and freezer environments are high in humidity. Believe it or not, plastic is a little bit humidity-permeable. So, for the fridge or freezer, aim for using glass or metal containers with gasketed lids.
How do you know if your seeds are “very dry”? If they are big enough to bend, they should shatter when you fold them. Or if you hit them with a hammer they should shatter, not smoosh. For very small seeds, like chickweed, the Organic Seed Alliance suggests that you can test the dryness of a batch of seed by using two paper envelopes or bags. Start with envelopes that feel “crisp” at normal room conditions. Fill one paper container with your test seed, leave one container empty as a control. Store both envelopes in the same area overnight. Then next day, empty the paper container of seed and compare the crispness of the two paper envelopes in your hands. If the bag you stored the seed in feels softer and more malleable than the control envelope, then your seeds are not yet dry enough.
How do you get seeds very dry? If you need to dry your seed further before putting it in air-tight containers, you can use silica gel (available at craft stores) as a desiccant. It is possible to over-dry seeds, so you do not want to leave the seeds in with the silica gel desiccant for more than 1-2 weeks.
- Measure weight of seed you are drying.
- Measure out an equal weight of silica gel and place the gel in an old clean sock, or new tea bag papers, or in a paper envolope that you seal and tape all seams. Just make sure the silica can’t mix in with the seed.
- Place seed in a container so they seed fills most the container up, but leaves space for the silica gel packet you made to be added.
- Screw lid on tightly.
- Check a small seed sample daily for 2-7 days until the seed reaches the “very dry” state and shatters.
- Remove silica bundle and immediately repack seed for long-term storage. (If you leave the seed exposed to the room air, the seed will start to act as a sponge to pull in humidity, so get it into it back into air-tight storage right away while it is still very dry.
Once you take your seed out of fridge or freezer, always allow the container to come up to room temperature before you open it. If the seed is colder than room temperature when you open the container, moisture will condense on the cool seed just like it does on the side of an iced drink in summertime, and ruin your seed drying efforts. Every time you open the container you are exposing it to higher-humidity air and the seed will immediately start to act as a sponge re-moisturizing itself. So minimize opening the container and try to avoid opening your container coming out of a refrigerator, and on rainy or high humidity days! With care, those seeds will stay good for years, if need be.
Old Seeds, are They Still Good?
Let’s say you have a bunch of old seeds and you want to know if they are still alive and good. The easiest way is to try to sprout some of the seeds and see what your germination rate is. Sprouts=alive seed.
There is also something called tetrazolium testing (85% TZ) which detects whether the seeds are breathing— that is— alive. I doubt this is anything you will feel the need to pursue, but if you want more info on who could provide this service, I would start with checking with a your local Agriculture Extension office.